Welcome to my personal webpage. | home
Driver Amplifier and Low Pass Filter | Butterworth Low-Pass Filters and Applications of Spectrum Analyzer | BJT Amplifiers | MOSFET CS Amplifiers with Active Load | Common Emitter Circuit | ACCELEOMETER SENSOR | Diode Waveform Shaping / Electronics Projects
ACCELEOMETER SENSOR
EE 310 Electronic Circuit Design
Fall 2001
Op Amp Design Project
September 19, 2001
Nima Moshtagh
Introduction
Our particular design application involves the measurement of an automobile's acceleration using an integrated-circuit (IC) accelerometer. As the electrical engineer assigned to an automotive task group, we are supposed to design the accelerometer interface circuitry that will perform the following functions: 1) provide a linear display for the acceleration measurements; 2) indicate when the automobile's acceleration / deceleration is exceeding 0.1 G in magnitude; and 3) signal when a significant
deceleration (< -6 G) exists to warrant air bag deployment. The first of these design tasks fulfills a diagnostic requirement necessary for automotive monitoring and testing. The second requirement is the efficiency measure that signals when the car is either accelerated or braked too heavily. Finally, the third design function is an emergency diagnostic that senses and triggers the deployment of an air bag, or possibly a form of emergency braking. Indication of conditions for the second and third design requirements will be represented using LEDs.
Signal Conditioning Circuitry
The Model 1210 Analog Accelerometer manufactured by Silicon Designs, Inc. has been chosen for this design. The accelerometer's analog output voltages, which are proportional to the measured acceleration, can be accessed in either of two forms: 1) a differential output voltage having a range of ±5 V; 2) a single-ended output voltage with a range of 0-5 V. (The single-ended output voltage is referenced to ground, and ideally it equals 2.5 V for 0-G acceleration.) Actually, the single-ended output voltage can be obtained from either pin 12 (AOP) or pin 16 (AON). The output specifications are shown in page 4.
For developing and demonstrating the design, an accelerometer is not necessary and instead, test-voltage patterns are used to represent the output signal (12 and 16). The waveform generator with an offset voltage is being used to represent the signal at one of these pins (AOP or pin 12); the other output pin's signal (AON or pin 16) is developed by using circuitry.
For monitoring and testing purposes, the accelerometer measurements will be presented in the following two formats: 1) the range of values ±10 G linearly corresponding to ±5 V, and 2) the range of values ±0.2 G linearly corresponding to 0-5V.
While it might seem preferable to choose either pin 12 (AOP) or 16 (AON) of the accelerometer to supply a single-ended output voltage with reference to ground, we use both of these pins to provide a differential output voltage. A possible advantage to the differential output voltage is that it reduces any drift effects introduced through the mid-scale reference voltage (2.5 V).
Acceleration Indicator / Monitor
As already explained, two important functions are envisioned for the accelerometer. An LED display will provide information to the driver whenever the car is accelerating or decelerating too rapidly. For demonstration purposes, the LED display is to indicate whenever the automobile's acceleration or deceleration exceeds a magnitude of 0.1 G.
The accelerometer's second function is as an indicator for air bag deployment or possibly some collision avoidance measure. The SAE (Society of Automotive Engineers) Handbook suggests that a test for airbag deployment in the case of a vehicle subjected to a "mild" collision is a deceleration of 6 Gs in the shape of a half sine wave for a period of 150 ms. Indication of air bag deployment will also be simulated by an LED.
Design Approach
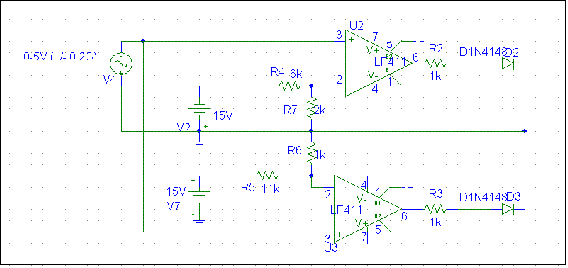
To generate the outputs of the accelerometer we will be using the output of the signal generator as AOP (pin 12) and then by using an inverting amplifier with the gain of unity, we can produce AON. The differential output voltage can be used to indicate the amount of acceleration. When the difference voltage between AOP and AON is zero, there is no acceleration while at both extremes with the difference of 4 V we can get up to 10 G acceleration. The range of the accelerometer output is 0.5-4.5 V, but we don't have to use DC offset voltage to shift the output of the generator because we are using the difference output voltage.
The following circuit diagram shows the circuit designed to develop AOP and AON.
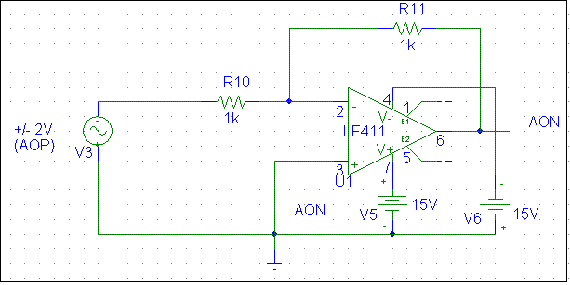
Attachment A shows the Pspice simulation of the circuit.
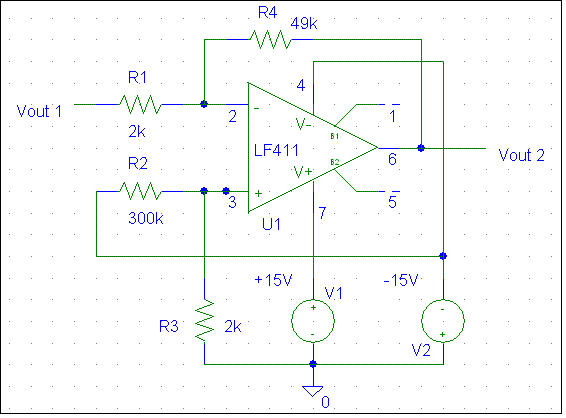
The first output of the conditioning circuitry should indicate -10G to +10G corresponding to -5V to +5V. Using a difference amplifier, we can accomplish the first part. The calculations show how we can find the proper ratio for resistors.
In the theory we can use R2 = 5k W & R1 = 4k W.

We can derive this table for the output of the conditioning circuitry.
Acceleration ( G )
|
V2-V1 or AOP - AON
|
Vout
|
-10
|
0.5 - 4.5 = -4.0 V
|
-5.0 V
|
0
|
2.5 - 4.5 = 0 V
|
0 V
|
+10
|
4.5 - 0.5 = 4.0 V
|
+ 5.0 V
|
Attachment A displays AON, AOP and Vout.
The second output is 0 - 5 V corresponding to -0.2G to +0.2G. In compare to 10 G, 0.2 G is a small amount of acceleration and hence generates a small output voltage in accelerometer. Therefore we should magnify the output and gain it such that the second output equals +5 V.
Calculations:
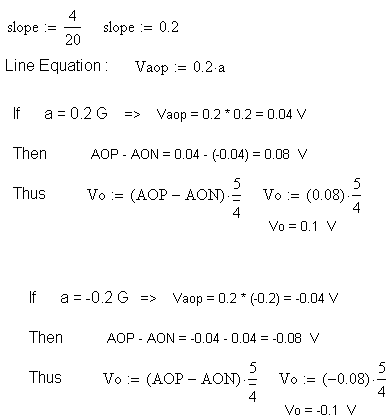
Considering the preceding calculation, we can get the following data.
Acceleration (G)
|
Vout 1
|
Vout 2
|
+0.2 G
|
+0.1
|
5 V
|
-0.2 G
|
-0.1
|
0 V
|
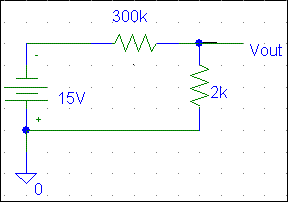
The circuitry that we used is a difference amplifier. If we take the difference between Vout and -0.01 V and gain it, we would get the desired output (Circuit bellow). In order to generate -0.1 V we use this voltage divider:
Following calculations determine the required ratio of resistors.
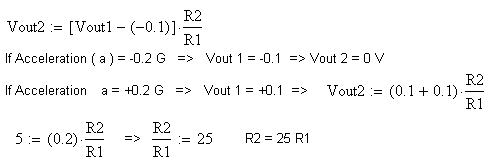
We can pick up 2kW for R1 and 50kW for R2.
Acceleration Indicator/Monitor
The acceleration indicator that is an LED should alert the driver when the car is accelerating or decelerating too rapidly. The acceleration considered for this purpose is 0.1 G. Therefore we should find out what the outputs of our conditioning circuitry are at this acceleration. In this design we used Vout 2 as the input for our monitoring circuitry. The following linear comparison is an easy way to find the voltages that we need to work with.
0 1.25 2.5 3.75 5 V Vout 2
|--------|------------------|---------|
| |
| |
|--------|------------------|----------|
-0.2 -0.1 0 0.1 +0.2 G Acceleration
One can easily infer that the range of 1.25-3.75 at Vout 2 corresponds to +/-0.1G.
So we need to compare Vout 2 with two values 1,25 and 3.75 V.
If Vout 2 > 3.75 or Vout 2 < 1.25 then we have too much acceleration or deceleration. Circuit bellow is the comparator amplifier designed for this purpose.
A simple diagram for the output would be:
Airbag Deployment Indicator
If the deceleration is less than -6 G, a separate LED will go on to warrant the deployment of the airbag. I used the same procedure to attain the voltage required to compare the input signal with. (We used Vout 1 in this part.)
Acceleration
|
Vout 1
|
LED
|
-10
|
-5
|
ON
ON
|
-6
|
-3
|
|
+10
|
+5
|
OFF
OFF
|
-10 -6 0 6 10 G Acceleration
|--------|------------------|---------|
|
|
|--------|------------------|---------|
-5 -3 0 3 5 V Voltage ( Vout 1)
Thus we should compare Vout 1 with -3 V. Look at the table above.

Since the output current for the Op Amp should not preferably exceed 1mA, the output resistor determined as: